对于SSH服务的常见的攻击就是暴力破解攻击——远程攻击者通过不同的密码来无限次地进行登录尝试。当然SSH可以设置使用非密码验证验证方式来对抗这种攻击,例如公钥验证或者双重验证。将不同的验证方法的优劣处先放在一边,如果我们必须使用密码验证方式怎么办?你是如何保护你的 SSH 服务器免遭暴力破解攻击的呢?
fail2ban 是 Linux 上的一个著名的入侵保护的开源框架,它会监控多个系统的日志文件(例如:/var/log/auth.log 或者 /var/log/secure)并根据检测到的任何可疑的行为自动触发不同的防御动作。事实上,fail2ban 在防御对SSH服务器的暴力密码破解上非常有用。
在这篇指导教程中,我会演示如何安装并配置 fail2ban 来保护 SSH 服务器以避免来自远程IP地址的暴力攻击。
常用命令
#重启
systemctl restart fail2ban
#启动
systemctl start fail2ban
#停止
systemctl stop fail2ban
#开机启动
systemctl enable fail2ban
#查看被ban IP,其中sshd为名称,比如上面的[wordpress]
fail2ban-client status sshd
#删除被ban IP
fail2ban-client set sshd delignoreip 192.168.111.111
#查看日志
tail /var/log/fail2ban.log
在linux上安装Fail2ban
为了在CentOS 或 RHEL上安装fail2ban,首先设置EPEL仓库,然后运行以下命令。
1. cd /root/oneinstack && ./addons.sh -> 10.Install:fail2ban  # 推荐这个安装
2. yum install fail2ban -y
为SSH服务器配置Fail2ban
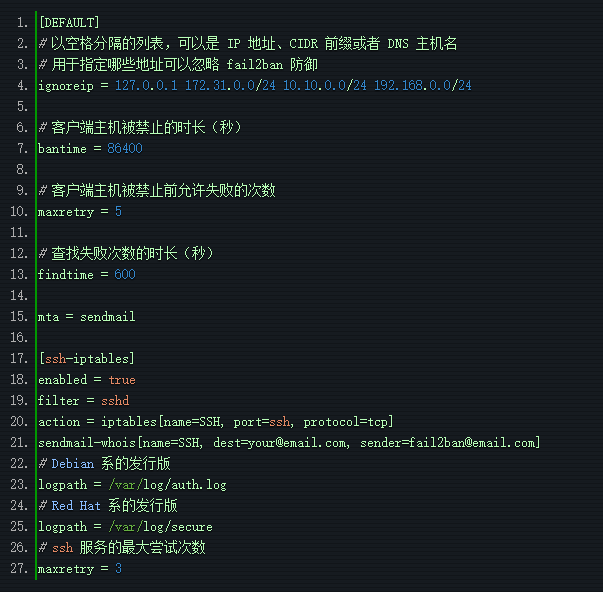
现在你已经准备好了通过配置 fail2ban 来加强你的SSH服务器。你需要编辑其配置文件 /etc/fail2ban/jail.conf。 在配置文件的“[DEFAULT]”区,你可以在此定义所有受监控的服务的默认参数,另外在特定服务的配置部分,你可以为每个服务(例如SSH,Apache等)设置特定的配置来覆盖默认的参数配置。
在针对服务的监狱区(在[DEFAULT]区后面的地方),你需要定义一个[ssh-iptables]区,这里用来定义SSH相关的监狱配置。真正的禁止IP地址的操作是通过iptables完成的。
下面是一个包含“ssh-iptables”监狱配置的/etc/fail2ban/jail.conf的文件样例。当然根据你的需要,你也可以指定其他的应用监狱。
vi /etc/fail2ban/jail.local
例:
[DEFAULT]
ignoreip = 127.0.0.1/8
bantime = 86400
findtime = 600
mta = sendmail # 增加
maxretry = 10
[ssh-iptables]
enabled = true
filter = sshd
action = iptables[name=SSH, port=22, protocol=tcp]
sendmail-whois[name=SSH, dest=admin@cndo.org, sender=admin@cndo.org] # 增加
logpath = /var/log/secure
maxretry = 10
根据上述配置,fail2ban会自动禁止在最近10分钟内有超过3次访问尝试失败的任意IP地址。一旦被禁,这个IP地址将会在24小时内一直被禁止访问 SSH 服务。这个事件也会通过sendemail发送邮件通知。
一旦配置文件准备就绪,按照以下方式重启fail2ban服务。
在 Debian, Ubuntu 或 CentOS/RHEL 6:
sudo service fail2ban restart
在 Fedora 或 CentOS/RHEL 7:
sudo systemctl restart fail2ban
为了验证fail2ban成功运行,使用参数'ping'来运行fail2ban-client 命令。 如果fail2ban服务正常运行,你可以看到“pong(嘭)”作为响应。
sudo fail2ban-client ping
Server replied: pong
测试 fail2ban 保护SSH免遭暴力破解攻击
为了测试fail2ban是否能正常工作,尝试通过使用错误的密码来用SSH连接到服务器模拟一个暴力破解攻击。与此同时,监控 /var/log/fail2ban.log,该文件记录在fail2ban中发生的任何敏感事件。
sudo tail -f /var/log/fail2ban.log
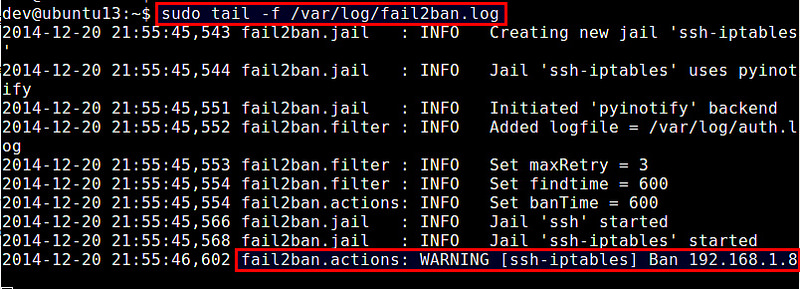
根据上述的日志文件,Fail2ban通过检测IP地址的多次失败登录尝试,禁止了一个IP地址192.168.1.8。
检查fail2ban状态并解禁被锁住的IP地址
由于fail2ban的“ssh-iptables”监狱使用iptables来阻塞问题IP地址,你可以通过以下方式来检测当前iptables来验证禁止规则。
sudo iptables --list -n
Chain INPUT (policy ACCEPT)
target     prot opt source        destination
fail2ban-SSH  tcp  -  0.0.0.0/0 0.0.0.0/0     tcp dpt:22
Chain FORWARD (policy ACCEPT)
target  prot opt source            destination
Chain OUTPUT (policy ACCEPT)
target     prot opt source        destination
Chain fail2ban-SSH (1 references)
target     prot opt source        destination
DROP   all  --  192.168.1.8     0.0.0.0/0
RETURN  all  --  0.0.0.0/0      0.0.0.0/0
如果你想要从fail2ban中解锁某个IP地址,你可以使用iptables命令:
sudo iptables -D fail2ban-SSH -s 192.168.1.8 -j DROP

查询限制列表: iptables -L --line-numbers
解除限制: iptables -D fail2ban-SSH 1
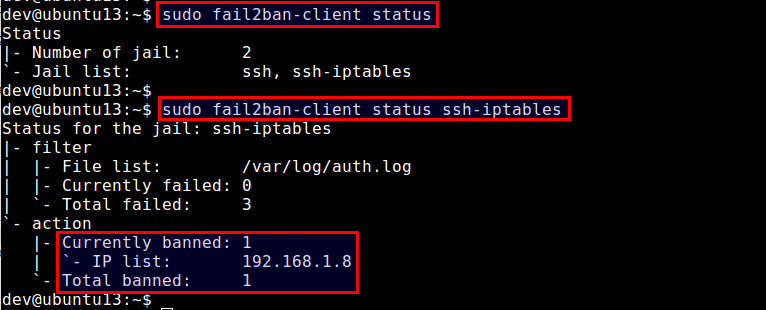
当然你可以使用上述的iptables命令手动地检验和管理fail2ban的IP阻塞列表,但实际上有一个适当的方法就是使用fail2ban-client命令行工具。这个命令不仅允许你对"ssh-iptables"监狱进行管理,同时也是一个标准的命令行接口,可以管理其他类型的fail2ban监狱。
为了检验fail2ban状态(会显示出当前活动的监狱列表):fail2ban-client status
为了检验一个特定监狱的状态(例如ssh-iptables): fail2ban-client status ssh-iptables
上面的命令会显示出被禁止IP地址列表。
为了解锁特定的IP地址:
sudo fail2ban-client set ssh-iptables unbanip 192.168.1.8
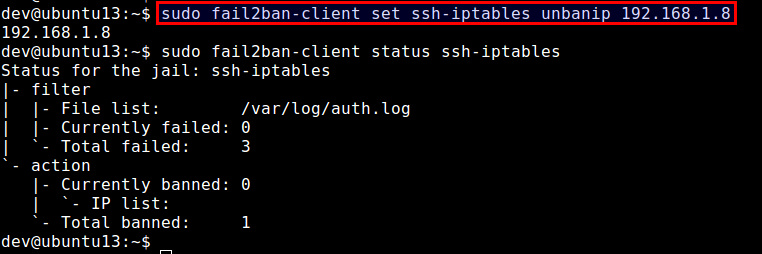
注意,如果你停止了Fail2ban 服务,那么所有的IP地址都会被解锁。当你重启 Fail2ban,它会从/etc/log/secure(或 /var/log/auth.log)中找到异常的IP地址列表,如果这些异常地址的发生时间仍然在禁止时间内,那么Fail2ban会重新将这些IP地址禁止。
设置 Fail2ban 自动启动
一旦你成功地测试了fail2ban之后,最后一个步骤就是在你的服务器上让其在开机时自动启动。在基于Debian的发行版中,fail2ban已经默认让自动启动生效。在基于Red-Hat的发行版中,按照下面的方式让自动启动生效。
在 CentOS/RHEL 6中:
sudo chkconfig fail2ban on
在 Fedora 或 CentOS/RHEL 7:
sudo systemctl enable fail2ban
总结
在该教程中,我演示了如何安装并配置fail2ban来保护一个SSH服务器。当然fail2ban可以缓解暴力密码攻击,但是请注意,这并不能保护SSH服务器避免来自复杂的分布式暴力破解组织,这些攻击者通过使用成千上万个机器控制的IP地址来绕过fail2ban的防御机制。
防护规则
[DEFAULT]
ignoreip = 127.0.0.1/8
bantime = 86400
findtime = 600
mta = sendmail
maxretry = 10
[ssh-iptables]
enabled = true
filter = sshd
action = iptables[name=SSH, port=22, protocol=tcp]
sendmail-whois[name=SSH, dest=admin@cndo.org, sender=fail2ban@cndo.org]
logpath = /var/log/secure
maxretry = 10
#apache防攻击规则
# 检测密码认证失败
[apache]
enabled = true
port = http,https
filter = apache-auth
logpath = /var/log/httpd/*error_log
maxretry = 6
# 检测抓取邮件地址的爬虫
[apache-badbots]
enabled = true
port = http,https
filter = apache-badbots
logpath = /var/log/httpd/*access_log
bantime = 172800
maxretry = 1
# 检测漏洞和 PHP 脆弱性扫描
[apache-noscript]
enabled = true
port = http,https
filter = apache-noscript
logpath = /var/log/httpd/*error_log
maxretry = 6
# 检测 Apache 溢出攻击
[apache-overflows]
enabled = true
port = http,https
filter = apache-overflows
logpath = /var/log/httpd/*error_log
maxretry = 2
# 检测在服务器寻找主目录的尝试
[apache-nohome]
enabled = true
port = http,https
filter = apache-nohome
logpath = /var/log/httpd/*error_log
maxretry = 2
# 检测执行不存在的脚本的企图
# 这些都是流行的网站服务程序
# 如:webmail, phpMyAdmin,WordPress
port = http,https
filter = apache-botsearch
logpath = /var/log/httpd/*error_log
maxretry = 2
防止CC攻击
这里仅以Nginx为例,使用fail2ban来监视nginx日志,匹配短时间内频繁请求的IP,并使用firewalld将其IP屏蔽,达到CC防护的作用。
#需要先新建一个nginx日志匹配规则
vi /etc/fail2ban/filter.d/nginx-cc.conf
#填写如下内容
[Definition]
failregex =  -.*- .*HTTP/1.* .* .*$
ignoreregex =
继续修改jail.local追加如下内容:
[nginx-cc]
enabled = true
port = http,https
filter = nginx-cc
action = %(action_mwl)s
maxretry = 20
findtime = 60
bantime = 3600
logpath = /usr/local/nginx/logs/access.log
上面的配置意思是如果在60s内,同一IP达到20次请求,则将其IP ban 1小时,上面只是为了测试,请根据自己的实际情况修改。logpath为nginx日志路径。
httpd下的规则:
vi /etc/fail2ban/jail.local
[DEFAULT]
ignoreip = 127.0.0.1/8 207.246.123.91/24
bantime  = 86400
findtime = 600
#mta = sendmail
maxretry = 5
[ssh-iptables]
enabled = true
filter  = sshd
action  = iptables[name=SSH, port=22, protocol=tcp]
#sendmail-whois[name=SSH, dest=admin@cndo.org, sender=fail2ban@cndo.org]
logpath = /var/log/secure
maxretry = 5
#apache防攻击规则
    # 检测密码认证失败
    [apache]
    enabled  = true
    port     = http,https
    filter   = apache-auth
    logpath  = /var/log/httpd/*error_log
    maxretry = 6
    # 检测抓取邮件地址的爬虫
    [apache-badbots]
    enabled  = true
    port     = http,https
    filter   = apache-badbots
    logpath  = /var/log/httpd/*access_log
    bantime  = 172800
    maxretry = 1
    # 检测漏洞和 PHP 脆弱性扫描
    [apache-noscript]
    enabled  = true
    port     = http,https
    filter   = apache-noscript
    logpath  = /var/log/httpd/*error_log
    maxretry = 6
    # 检测 Apache 溢出攻击
    [apache-overflows]
    enabled  = true
    port     = http,https
    filter   = apache-overflows
    logpath  = /var/log/httpd/*error_log
    maxretry = 2
    # 检测在服务器寻找主目录的尝试
    [apache-nohome]
    enabled  = true
    port     = http,https
    filter   = apache-nohome
    logpath  = /var/log/httpd/*error_log
    maxretry = 2
    # 检测执行不存在的脚本的企图
    # 这些都是流行的网站服务程序
    # 如:webmail, phpMyAdmin,WordPress
    port     = http,https
    filter   = apache-botsearch
    logpath  = /var/log/httpd/*error_log
    maxretry = 2


