一、 mongodb单机安装
1.1 下载解压并安装
下载mongodb-linux-x86_64-3.4.6.tgz , 镜像地址
https://www.mongodb.org/dl/linux/x86_64
#解压
tar -xzvf mongodb-linux-x86_64-rhel70-v3.6-latest.tgz -C /usr/local/
#改名
mv mongodb-linux-x86_64-rhel70-v3.6-latest.tgz mongodb
1.2 配置环境变量
vim /etc/profile
# 内容
export MONGODB_HOME=/usr/local/mongodb
export PATH=$MONGODB_HOME/bin:$PATH
# 使立即生效
source /etc/profile
二、 fluentd安装
2.1 调整安装的Linux环境
在安装Fluentd之前,您必须按照以下步骤设置您的环境(不是必要的,我家里电脑没有这样做)。
参考官网
2.2 在线或离线安装fluentd
两种安装方式,能联网的话,肯定优先使用在线安装了
在线安装:
curl -L https://toolbelt.treasuredata.com/sh/install-redhat-td-agent3.sh | sh
离线安装:先下载:td-agent-3.1.1-0.el7.x86_64.rpm
https://td-agent-package-browser.herokuapp.com/3/redhat/7/x86_64
下载完后,运行:rpm -ivh td-agent-3.1.1-0.el7.x86_64.rpm
2.3 运行fluentd服务
/etc/init.d/td-agent start
查看状态,停止,重启等命令如下
/etc/init.d/td-agent start
/etc/init.d/td-agent stop
/etc/init.d/td-agent restart
/etc/init.d/td-agent status
有问题去 vim /var/log/td-agent/td-agent.log 查看日志信息
刚开始安装的时候,尝试使用官网的那个例子, 测试收集apache的日志
2.4 配置fluentd文件
Vi /etc/td-agent/td-agent.conf
在配置中添加
<source>
  @type tail # 从文件的末尾的方式读取数据
  path /var/log/httpd/access_log  #apache服务器产生的日志文件位置,注意了,这个貌似centos和ubuntu不一致,官网的那个日志目录在centos中不存在的
  pos_file /var/log/td-agent/apache2.access_log.pos #一个镜像文件,默认是这个
  # apache2:自带的解析器,apache服务器产生的日志,fluentd默认提供了一个解析方法(若不用这个方法,需要自己配置format等配置)
  <parse>
    @type apache2
  </parse>
  tag mongo.apache.access # tag, 接收的tag</source>

<match mongo.**>  # plugin type
  @type mongo # 引入插件为mongo,使用这个必须要安装fluentd-mongo的插件

  # mongodb db + collection
  database apache # mongodb的数据库
  collection access # 放在哪个集合中

  # mongodb host + port
  host localhost #数据库host
  port 27017 # 数据库端口

  # interval
  <buffer>
    flush_interval 10s #10秒钟刷新读取一次
  </buffer>  # make sure to include the time key
  <inject>
    time_key time
  </inject>
</match>
2.5 重启fluentd,然后查看fluentd的状态
/etc/init.d/td-agent restart
/etc/init.d/td-agent status
上面肯定报错,应该会报fluent-plugin-mongo插件找不到
2.6 fluent-plugin-mongo 插件安装
这个插件依赖于ruby2.0以上的版本, 所以先要安装fluent-plugin-mongo
下载一个ruby2.0以上的版本
编译安装
wget https://cache.ruby-lang.org/pub/ruby/2.5/ruby-2.5.0.tar.gz
tar -xzvf ruby-2.5.0.tar.gz
mv ruby-2.5.0 ruby
mv /root/ruby /usr/local
cd /usr/local/ruby
./configure
make
make install  (root)
安装fluent-plugin-mongo 插件
在线版:==因为我们用的是rpm安装的,所以一定要使用td-agent-gem来安装,不能直接使用gem!!!== 否则即使安装了插件,可能fluentd还是找不到这个插件。
cd /usr/sbin/
td-agent-gem install fluent-plugin-mongo
离线安装: 有的服务器集群不允许连接外网,就只能离线安装了
下载 fluent-plugin-mongo-1.0.0.gem 官网–>plugin–>下载fluentd-plugin-mongo-1.0.0.gem
cd /usr/sbin/
td-agent-gem install fluent-plugin-mongo-1.0.0.gem
2.7 安装完后重启fluentd
/etc/init.d/td-agent restart
/etc/init.d/td-agent status
2.8 测试
使用nginx的日志来测试
开启一个apache server服务
开启服务的方法 service nginx start
使用ab test来测试:
ab -n 100 -c 10 http://localhost/
并发10,请求100此,我们用的是centos6.5, 所以此日志会保存在
/var/log/nginx/access.log 中,日志的格式如下
::1 - - [25/Dec/2017:15:58:03 +0800] "GET / HTTP/1.0" 403 5039 "-" "ApacheBench/2.3"
::1 - - [25/Dec/2017:15:58:03 +0800] "GET / HTTP/1.0" 403 5039 "-" "ApacheBench/2.3"
::1 - - [25/Dec/2017:15:58:03 +0800] "GET / HTTP/1.0" 403 5039 "-" "ApacheBench/2.3"
::1 - - [25/Dec/2017:15:58:03 +0800] "GET / HTTP/1.0" 403 5039 "-" "ApacheBench/2.3"
::1 - - [25/Dec/2017:15:58:03 +0800] "GET / HTTP/1.0" 403 5039 "-" "ApacheBench/2.3"
::1 - - [25/Dec/2017:15:58:03 +0800] "GET / HTTP/1.0" 403 5039 "-" "ApacheBench/2.3"
::1 - - [25/Dec/2017:15:58:03 +0800] "GET / HTTP/1.0" 403 5039 "-" "ApacheBench/2.3"
注意: /var/log/nginx/ 目录的权限
chmod 777 /var/log/nginx/
如果第一次没改权限有问题了,建议把/var/log/nginx/access_log 文件删掉,重启nginx ,然后ab -test
mongodb查看效果
> use nginx
> db["access"].find()
{ "_id" : ObjectId("5a3ce656e138230dc48c58a6"), "host" : "::1", "user" : null, "method" : "GET", "path" : "/", "code" : 403, "size" : 4961, "referer" : null, "agent" : "ApacheBench/2.3", "time" : ISODate("2017-12-22T11:02:36Z") }
{ "_id" : ObjectId("5a3ce656e138230dc48c58a7"), "host" : "::1", "user" : null, "method" : "GET", "path" : "/", "code" : 403, "size" : 4961, "referer" : null, "agent" : "ApacheBench/2.3", "time" : ISODate("2017-12-22T11:02:36Z") }
{ "_id" : ObjectId("5a3ce656e138230dc48c58a8"), "host" : "::1", "user" : null, "method" : "GET", "path" : "/", "code" : 403, "size" : 4961, "referer" : null, "agent" : "ApacheBench/2.3", "time" : ISODate("2017-12-22T11:02:36Z") }
{ "_id" : ObjectId("5a3ce656e138230dc48c58a9"), "host" : "::1", "user" : null, "method" : "GET", "path" : "/", "code" : 403, "size" : 4961, "referer" : null, "agent" : "ApacheBench/2.3", "time" : ISODate("2017-12-22T11:02:36Z") }
apache日志收集完成
java程序log日志如何写入到fluentd中
本人思考有两种方式,一种是往本地写log日志,使用log4j或者其他方法向本地写日志后,fluentd使用in-tail的方式(类似于上面的方式)读取,保存到mongodb中, 这个格式就不再是apache了,需要自己写解析日志的规则
一种是通过forward端口的方式
这里介绍第二种方式
修改配置文件 vi /etc/td-agent/td-agent.conf
<source>
  @type forward
  port 24234
</source>
<match fluentd.test.*>
  @type mongo
  host 127.0.0.1
  port 27017
  database nginx
  tag_mapped
  remove_tag_prefix mongo.
  collection misc
</match>
java代码,为了测试效果,一次发30万条数据
这个程序需要引入一系列jar包,什么log4j, slf4j啊,javassist,msgpack,fluentd-logger等jar包,去maven仓库下载即可
public class TestFluentdLog {
    // fluentd.test 要和上面的配置文件的一致
    private static FluentLogger LOG = FluentLogger.getLogger("fluentd.test", "192.168.x.xxx", 24234);
    public static void main(String[] args) {
        for (int i = 0; i < 30000; i++) {
            Map<String, Object> data = new HashMap<String, Object>();
            data.put("log1", "aaa"+i);
            data.put("to", "bbb"+i);
            LOG.log("follow", data); //...
        }
        LOG.close();
    }
}
进入到mongodb
mong
use admin
db.createUser({user:'root',pwd:'bnh1923', roles:[{role:'root', db:'admin'}]})
db.getCollectionNames()
> use nginx  # 建立数据库
switched to db nginx
db["nginx.test.follow"].find() # 查看数据
show dbs    # 显示数据库
发现出现nginx, 然后发现这个数据比空的数据库要大,说明有文件了
nginx  0.453GB
查看数据
> use nginx
switched to db nginx
> db["nginx.test.follow"].find()
{ "_id" : ObjectId("5a41e2f08d8c9539b4391bc2"), "from" : "aaa", "to" : "bbb", "time" : ISODate("2017-12-26T05:54:49Z") }
{ "_id" : ObjectId("5a41e2f08d8c9539b4391bc3"), "from" : "aaa", "to" : "bbb", "time" : ISODate("2017-12-26T05:55:48Z") }
{ "_id" : ObjectId("5a41e3888d8c953a39227d87"), "from" : "aaa", "to" : "bbb", "time" : ISODate("2017-12-26T05:57:19Z") }
{ "_id" : ObjectId("5a41e3888d8c953a39227d88"), "from" : "aaa", "to" : "bbb", "time" : ISODate("2017-12-26T05:58:00Z") }
{ "_id" : ObjectId("5a41e3e48d8c953aa6fe1216"), "from" : "aaa", "to" : "bbb", "time" : ISODate("2017-12-26T05:58:53Z") }
{ "_id" : ObjectId("5a41e5588d8c953aa6fe1217"), "from" : "aaa0", "to" : "bbb0", "time" : ISODate("2017-12-26T06:05:46Z") }
...
三、扩展
3.1 fluentd安装过程问题解决
有问题都是去vim /var/log/td-agent/td-agent.log 查看,然后看根据问题进行解决,多google,多上github看issues,仔细耐心
3.2 MongoDb web 用户界面
mongod –dbpath=/data/db –rest
MongoDB 的 Web 界面访问端口比服务的端口多1000。
首先得关闭防火墙
# 查询防火墙状态:
[root@localhost ~]# service   iptables status
# 停止防火墙:[root@localhost ~]# service   iptables stop
# 永久关闭防火墙:[root@localhost ~]# chkconfig   iptables off
如果你的MongoDB运行端口使用默认的27017,你可以在端口号为28017访问web用户界面,即地址为:http://localhost:28017
3.3 mongodb 3.4 集群搭建:分片+副本集
参考文章:
http://blog.csdn.net/T1DMzks/article/details/78916749
https://www.cnblogs.com/ityouknow/p/7344005.html
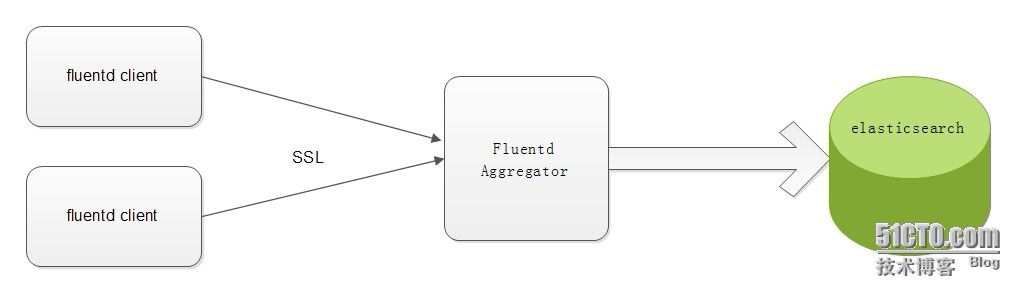
td-agent和elasticsearch、kibana搭建日志平台
服务端:elasticsearch和kibana、Fluentd Aggregator安装在一台机器上 IP为192.168.1.5
客户端:192.168.1.6 Mysql Server 192.168.1.7:tomcat Server
注意:1、2、3步服务端和客户端都要安装
yum install -y python-pip
pip install -y pyyaml
1、首先安装ruby
2、安装td-agent
3、安装td-agent插件
/usr/sbin/td-agent-gem install fluent-plugin-elasticsearch
/usr/sbin/td-agent-gem install fluent-plugin-typecast
/usr/sbin/td-agent-gem install fluent-plugin-secure-forward
4、安装elasticsearch(在服务端安装,需JDK1.7)
5、安装kibana(在服务端安装)
6、配置Fluentd Aggregator (在服务端安装)
td-agent-gem install fluent-plugin-elasticsearch
vi /etc/td-agent/td-agent.conf
# Listen to incoming data over SSL
<source>
  type secure_forward
  shared_key 123456 #密码设置,随便设,保持两边一致就行
  self_hostname logserver.test.com
  cert_auto_generate yes
</source>

# Store Data in Elasticsearch
<match *.**>
  type copy
  <store>
    type elasticsearch
    host localhost
    port 9200
    include_tag_key true
    tag_key log_name
    logstash_format true
    flush_interval 1s
  </store>
</match>
7、抓取mysql慢查询日志(客户端 192.168.1.6)
td-agent-gem install fluent-plugin-mysqlslowquery
vi /etc/td-agent/td-agent.conf
<source>
    type mysql_slow_query
    path /var/log/mysql/slow.log
    tag master.slow_query
</source>
<match *.**>
  type secure_forward
  shared_key 123456 #密码设置
  self_hostname master.test.com
  <server>
    host 192.168.1.5
  </server>
</match>
8、抓取tomcat日志(客户端 192.168.1.7)
vi /etc/td-agent/td-agent.conf
 <source>
     type tail
     path /usr/local/tomcat/logs/catalina.out
     pos_file /var/log/td-agent/tomcat_2_8080.log.pos
     tag tomcat_2_8080
     #format /^(?<error_time>(\[.+?\]|^\t\S.*))(?<flag>\s.+?\s)(?<info>([\s\S]*))|(?<msg>([\s\S]*))$/
     format /^(?<message>([\s\S]*))$/
 </source>
<source>
     type tail
     path /usr/local/tomcat1/logs/catalina.out
     pos_file /var/log/td-agent/tomcat_2_8081.log.pos
     tag tomcat_2_8081
     format /^(?<message>([\s\S]*))$/
     #format /^(?<error_time>(\[.+?\]|^\t\S.*))(?<flag>\s.+?\s)(?<info>([\s\S]*))|(?<msg>([\s\S]*))$/
 </source>
<match *.**>
  type secure_forward
  shared_key 123456
  self_hostname tomcat.test.com
  <server>
    host 192.168.1.5
  </server>
</match>
9.抓取nginx日志
<source>
  @type tail
  path /var/log/nginx/access.log
  pos_file /var/log/nginx/access.log.pos
  tag nginx.access
  format /^(?<host>[^ ]*) [^ ]* (?<user>[^ ]*) \[(?<time>[^\]]*)\] "(?<method>\S+)(?: +(?<path>[^ ]*) +\S*)?" (?<code>[^ ]*) (?<size>[^ ]*)(?: "(?<referer>[^\"]*)" "(?<agent>[^\"]*)")?$/
  time_format %d/%b/%Y:%H:%M:%S %z
</source>
<match nginx.access>
  @type elasticsearch
  host 192.168.10.98
  port 9200
#  index_name fluentd
  flush_interval 10s
  logstash_format true
#  typename fluentd
</match>
修改nginx.conf, 更改日志格式:
log_format main '$remote_addr $http_host [$time_local] "$request" $status $body_bytes_sent "$http_referer" "$http_user_agent"';
重启nginx:service nginx restart
查看fluentd的日志
tail -f /var/log/td-agent/td-agent.log
在kibana查看日志
参考文章:
https://blog.csdn.net/shiwenqing/article/details/50475330
https://blog.csdn.net/chenhaifeng2016/article/details/78683812
http://blog.51cto.com/slevin/1575235


